The same is true for the shorten/lengthen line. This may work for you but you may need to shorten or lengthen a pattern in segments of the pattern that aren’t at these lines. If you ever made a fix to a pattern using these guidelines and it still didn’t look as you’d hope, this blog post is for you.
Some may have luck holding the pattern up to their body and determining where they need to add or remove length. This doesn’t work well for me, because I’m busty and the pattern won’t lay flat. If you are using that method or something else that works well for you, then please continue using your method. This is just one of many ways to accomplish this task successfully
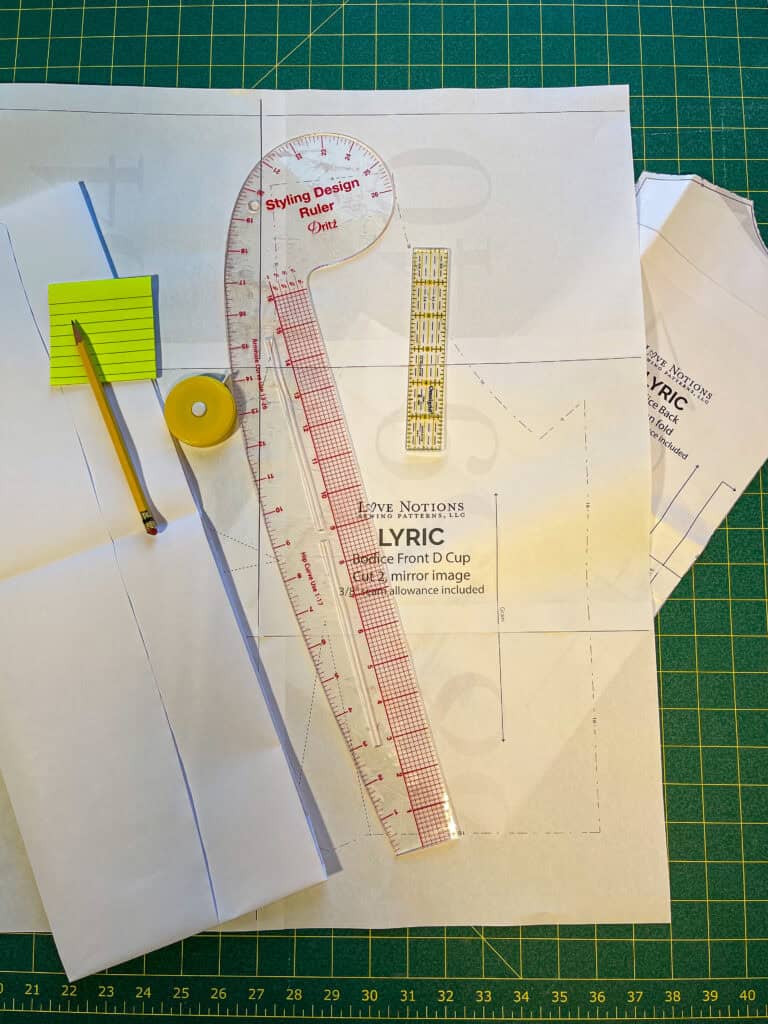
Gather your supplies
You’ll need the following:
-
- A tape measure
- Paper and a pencil to record your measurements
- French Curve Ruler
- Extra Paper if you need to add length or even out a curve
- The front and back bodice pattern pieces you’ll be working with
Find your measurements
I start this process by finding my own measurements. Katie Kimmell wrote a great blog post “How to take accurate measurements for sewing” that you can link to here on measuring yourself. Given my body measurements fluctuate, I use this often in order to ensure I don’t need to make updates to an already printed and adjusted pattern. You shouldn’t need to take length measurements as often. Katie’s post gives you a flavor for the length measurements. You can reference the “side waist” for an example.
I measure my outer shoulder to the bottom of my underarm (bottom of the underarm corresponds with the bottom of the armscye on the pattern piece), the bottom of my underarm to my waist (side waist in Katie’s blog), and my waist to my hip. Really you can use whatever areas of measurement make the most sense for you. Just ensure whatever you choose that you are being consistent and you are using the same reference points on your pattern pieces.
Compare your Measurements to the Pattern
Your measurements relied on your bust, waist, and hip. So what if those corresponding areas are not marked on your pattern pieces? You often can figure those out for yourself.
I look for the dips and curves. You also may be able to verify using the pattern’s finished measurements to identify the coordinating measurements for the bust, waist, and hip. That might not always work. For instance, if there is elastic at the waist that cinches the waist in, then that measurement may not match the chart. If your garment is boxy and there are no visible curves where you need to add length, then I would not worry too much about exactly where to add length. Also if the pattern has a waist dart like this Lyric, you would need to take into account the dart being sewn together when comparing it to the measurement chart.
You might find these hints helpful:
-
- Bust could be a curve after the armscye but before the next curve inward (waist) in the pattern
- Waist is often a dip into the pattern after the bust and then flares out again
- I find the hip more challenging to identify. I just find the widest point after the waistline and compare that to the pattern measurement. I’ve found this measurement is also not useful if you are making a crop top thanks to my teenager’s pattern requests. This is also true of a dress bodice that ends at your natural waist.
For the Lyric pattern, I mark the seam allowance on the skirt and top bodice and join them as one piece and then find the hip. This may be what you need to do on dresses and peplum tops.
Before you check the measurements, it’s very important to mark the seam allowances on the pattern pieces. Ensure when you measure that you are starting each measurement after the seam allowance. They would be 3/8” in the case of the Lyric. Make sure to take into account the following seam allowances:
-
- shoulder seam allowance
- waist seam allowance to confirm it correctly is hitting at your waist

We are using a top/dress for this example, but if you were making pants you would measure crotch to knee and then knee to ankle. The total of these two measurements should match your inseam.
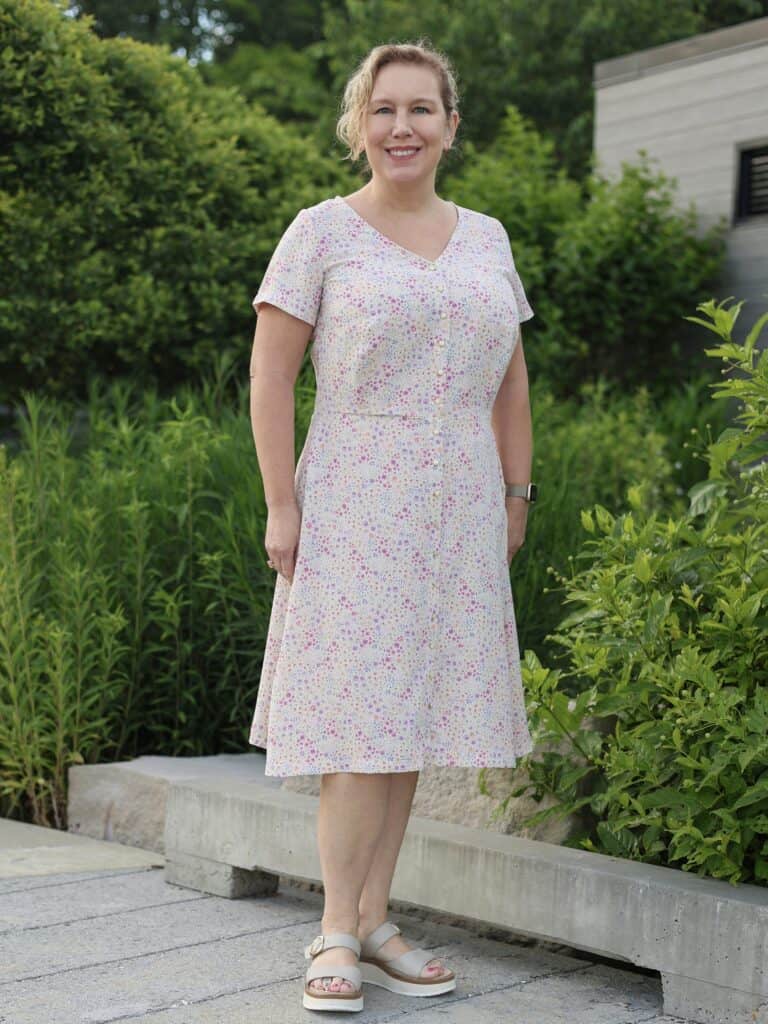
By the way, I’m using Lyric Dress and Peplum, and if you’d like, you can use my aff link to purchase this really versatile and lovely pattern.
Make Adjustments
Compare these measurements to your own body measurements to estimate where these points should fall on the pattern. Look for the key areas where length adjustments are needed, such as the shoulder to bottom of armscye, bust to waist, and waist to hip.
If your measurements are longer or shorter than the pattern’s measurements, you’ll need to add or remove length to/from the pattern. You may want to spread the length out in a couple places if possible, so the pattern pieces are not distorted. I try not to add or remove more than 1” at a time.

After you make your adjustments, ensure that any adjustments made to the length are smoothly blended into the pattern side seams. Blend and redraw curves with the French Ruler and straighten lines with ruler to maintain the shape of the garment. I either paste together my pattern or use a copy shop, so I like to not cut out my pattern until the adjustments are made and it gives me extra paper to redraw curves. Also, please remember you’ll want to add or remove length from an equivalent spot on the back pattern piece to keep everything in alignment.
You might also need to make some additional changes as a result of the length you’ve added or removed. If your body length measurements dictate that you need to add or remove length from the armscyes, then you’ll need to adjust the sleeves. Here is a great Love Notions blog that will walk you through that process. I’ve personally used this method and it works like a charm:
How to Adjust the Armscye – Love Notions Sewing Patterns
Another important factor with the Lyric pattern is the bust and waist darts. My all time favorite and most used Love Notions blog post was written by Noreen and discusses how to get your bust dart positioned correctly before making your muslin.
As far as the order in which you make your changes is really up to you to decide. I adjust my bust dart second because I usually need length added at my bust. I just draw a box around my dart and cut it out of the pattern piece and keep it to the side while I’m adjusting the length. If you need to add/remove length closer to your waist you could move the dart first.
You also may need to consider lowering or raising the end point and legs on your waist dart if you lower or raise your bust dart significantly. The length difference between the waist dart and bust dart is usually 1.5” – 3”. The waist dart is intended to contour and showcase your natural waist. So, you may want to alter this after you evaluate your muslin. Since I’m busty, I lowered my waist dart to be 2 1/2” from my bust dart point.

Make and Evaluate a Muslin
Now, you have your pattern pieces adjusted for your personal body lengths. I’m a big proponent of making a muslin before using your nicer fabric. You can link to some of the details like the fabric to use for a muslin in a blog post that I authored on making a muslin with the Duet Trousers:
As you cut out your fabric, you may want to mark the waist, bust, and hip on your muslin to help evaluate if those are in the correct spots on your body when you try it on. Then once you get your muslin sewn, you can check the marks you made for your bust and waist and hip match where it should be. If not, you’ll want to adjust your muslin and transfer those adjustments to your pattern pieces. I just make a muslin of my bodice for dresses, because I need to add length around my bust curve. You may also want to muslin a peplum or a short version of the dress if you are adding between your waist and hips.
Your adjusted pattern is now ready to use with your custom measurements. Usually I may make a few tweaks the second time I’m making my pattern, so don’t be discouraged if it’s not absolutely perfect. But you should complete a final garment that fits you very well.