Hi there everyone! It’s Koe here today, from Koetiquemade, coming to you from sunny Arizona. I’m here to share with you two pocket hacks for the Largo Cargo $5 Feature Friday! Fall is still a ways off for me but it’s just around the corner for others and Largo is perfect for the cooler weather. With its high waist, straight style legs and loads of pockets you will be right on trend for the season.

The Largo pattern is best suited for bottom weight woven fabrics such as denim and twill. But no one is going to hold you back if you have some different fabric you want to try. Just keep in mind it will look different than the tester pictures of Largo.
If you are like me and rarely sew a pattern as drafted then keep reading. I’m going to show you two different ways to change your Largo front patch pockets to be on the inside of the pants. It’s super easy and can work for nearly any pants pattern.

Let’s get started!
What you will need for this hack:
- Largo Cargo pattern
- Extra paper for tracing
- A pencil
- French curve ruler
- Enough fabric for your size
Make a pocket opening
The first thing we need to do is add a slant pocket opening to the front of the pants. To do this you simply line your pocket pattern piece up with the side of the pants where it’s supposed to go and make a dotted line. Then fold it on the dotted line before you cut your pants out. That will create a slash pocket opening.

Option 1: Pocket and Liner
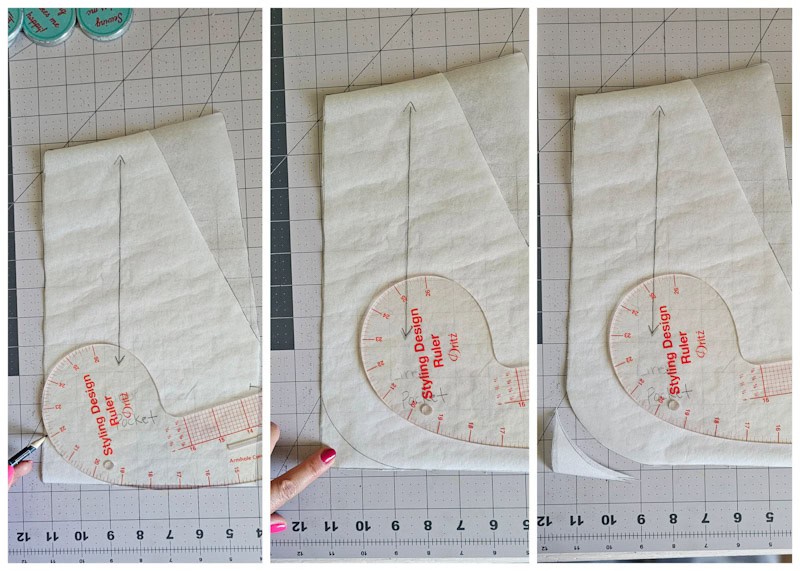
This first method requires two pieces; a pocket and liner. This is your typical slash pocket method. It’s used on a lot of different bottoms like khakis, sweatpants and even skirts. We already have a pocket pattern piece but we need a liner. So let’s make one!

To make the liner, place the pocket on top of the pants, lined up with the markings. Then trace the pocket, along with the top and side portion of the pants.

Make sure to transfer all the markings from the pocket piece to the liner as well. Cut that out and label it liner.

Something optional you can do is trace the pocket so you don’t ruin the pattern, and then round off the bottom left corners of the pocket and liner pattern pieces. That is what I did, but you don’t have to.
How to assemble
After you have cut out your pants and the pocket pieces, make sure you have transferred the pattern markings to the pieces you cut out. Then to assemble this pocket you:
- Place the pant front and pocket piece, right sides together and sew ⅜ inch on the slant.
- Press seams away from pants.
- Turn the pocket to the inside.
- Do a top stitch on the slant.

Next take the liner piece and:
- Use the markings to line up the pocket piece and the liner, make sure that the liner’s right side is facing the pocket.
- Sew around the outside edge of the pocket and liner then finish the edges so they don’t fray.
- Stay stitch along the top and side where the pocket and pants meet. This will keep it in place while you sew the rest of the pants.

Option 2: Pocket liner only
This method is probably my favorite way to do pockets. It’s ideal for form fitting garments like leggings or for bulky fabrics that you don’t want to see any pocket bulges on. This method is also great if you are short on fabric or want to add a bit of top stitching detail to your pants. You will only be using the pocket liner piece created above plus either some bias tape or scrap piece of fabric.
How to Assemble
Once you have cut out your pants and pocket liner you need to finish the pocket opening. To do that:
- Measure the pocket opening on the pants.
- Then cut two pieces of either bias tape or fabric long enough to fit the slash. I used fabric and mine were 8 ½ in. x 1 in.

3. Finish one long side of each fabric piece so the edges don’t fray and attach the raw edge of the fabric to the pocket opening, right sides together.
4. Once sewn, press the seam allowance away from the pants and then turn to the inside and press again.
5. Do a top stitch to keep in place.

6. Finish the edges of the liner and place it on top of the pants so you can trace around it. This is so you will have a line to follow when you top stitch the liner to the pants.
7. Then, match the pocket marking to the pant markings. Make sure the right side of the pocket liner is facing the inside of the pants. Which might sound wrong to put a right side to a wrong side, but the top part of the liner is seen. Hopefully that makes sense.
8. Pin it in place and sew a stay stitch to the top and side like was done for the previous hack.

9. Now, sew the pocket directly to the pants front following the pocket outline that was made. You can use a fun top stitch thread or twin needle to help add detail to your Largos!

Finish your Largos!
Once you have your pockets sewn to the inside in one of these two methods you can finish sewing your Largo Cargo pants according to the instructions. Have no fears about doing the zipper. The directions have a really great step by step tutorial to help you do that. It’s probably my favorite one ever.

Let’s be Friends!
Well, there you have it. Two different hacks for your Largo Cargo pockets. This pattern is one of my favorites! I paired it with another Love notions favorite, the Classic tee with a puff sleeve hack I shared on my personal blog and other socials. Come follow along on Pinterest, Instagram, Facebook and TikTok so we can chat about all our sewing projects! I can’t wait to see all your Largo Cargos with different pocket options!