Let’s make perfect buttonholes for your Ballad blouse!
Hello sewing friends, I’m AnCa from Flaxfield_sewing and I’m here today to share the feature Friday pattern of this week with you. And, as a little bonus, I can tell you my tips and tricks to make perfect buttonholes. Curious? Here we go…
Feature Friday Pattern
This week the beautiful Ballad Blouse is the featured Friday pattern. It’s a design meant for woven fabric with a little drape. It has a shirred and a gathered option on the front shoulder and no less than 5 options for the sleeves! Lots of choices.

Are Buttonholes Scary?
The closure of the blouse is a fully functional button down placket. I always find this a bit frightening. You finished your entire blouse and you are justifiably proud of it. But then you have to take that last step: sew the buttons and buttonholes. Of course you don’t want anything to go wrong … .
Don’t panic! With the following tips and equipment, you will certainly be fine.

ONE: DETERMINE BUTTON PLACEMENT
Determine the place where the buttonholes should be. Do this on the right front (as worn). Although Love notions always provides us with a buttonhole placement guide, the expanding sewing gauge is still a very handy tool to place your buttonholes at the perfect distance from each other. For example, I had found the perfect buttons for my blouse, only I didn’t had the proposed 6, but I only had five. Normally this is quite a calculation to reconsider where to place the buttonholes, but with the expanding sewing gauge it is a piece of cake.
You simply open up this metal tool to the desired length and you know exactly how to evenly space buttons and buttonholes.

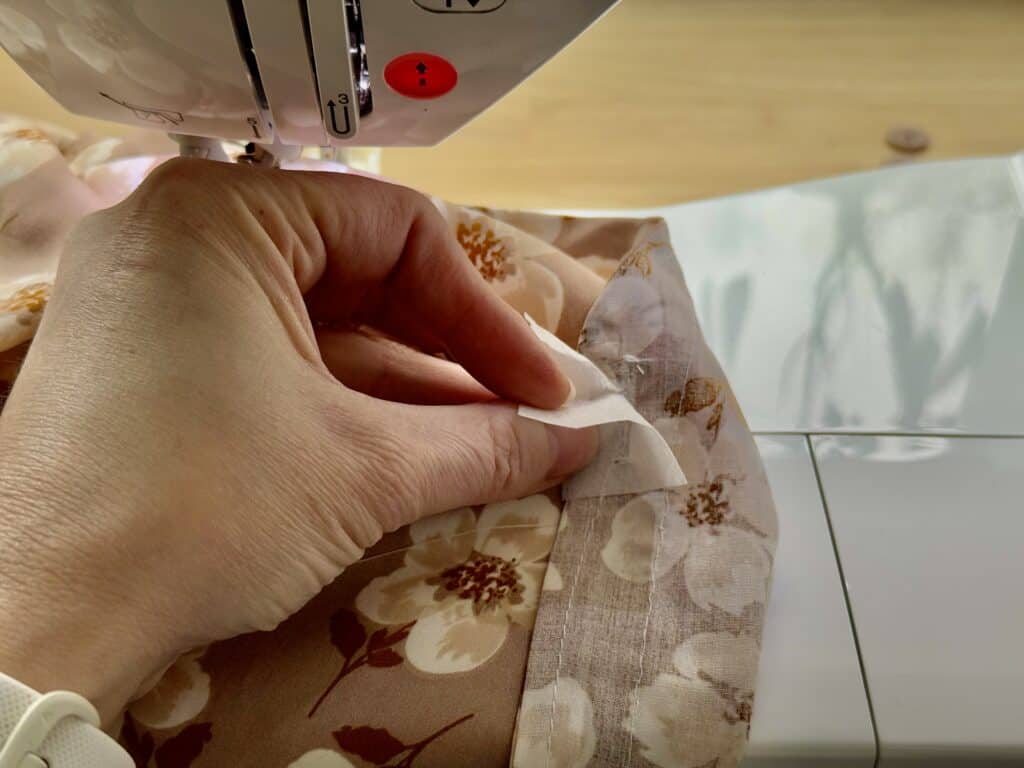
TWO: SEW BUTTONHOLES ON MACHINE
Now we are going to sew the buttonholes with the machine. Even though the area where the buttonholes will be placed is reinforced with interfacing, things can still go wrong, especially when sewing with lightweight or stretchy fabrics. To prevent that, I like to use tear-away stabilizer in addition to the interfacing. You cut off a piece of stabilizer, just a little bit bigger than your buttonhole will be, and you pin it to the back of your fabric. Then sew your buttonhole. Afterwards, you can easily tear away the stabilizer.

THREE: USE FRAYCHECK
Before I open the buttonhole, I first use Fray Check. This ensures that threads of the buttonhole do not come loose every time you pull a button through it. Your buttonholes will stay beautiful for years.

FOUR: OPEN BUTTONHOLE
Now we are going to open the buttonholes, a very delicate step in the process. If you use scissors or a seam ripper, I recommend placing pins at the beginning and at the end of your buttonhole to prevent overcutting. I think the buttonhole cutter is a cleaner and much more accurate option. Place the small cutting mat under the buttonhole and place the cutter exactly in the middle of the buttonhole on the front. Only a light pressure is needed to cut through the fabric. Now, all that’s left now is to test your new buttonholes with a button. Perfection!


Go ahread and sew the buttons to your Ballad Blouse and enjoy your beautiful masterpiece!
If you follow all these simple steps, buttonholes will no longer hold any secrets for you. They are just the next, small step in the sewing process.
Don’t forget to get your copy of the Ballad Blouse today for the price of only $5!
Happy sewing!
X
AnCa


More Button Projects
-

Band Camp Shirt
$12.50 -
Lyric Dress & Peplum
$12.50 -
Ballad Blouse
Original price was: $12.50.$5.00Current price is: $5.00. -
Aria Button Down Shirt, Tunic & Dress
$12.50


